Setting Up Penfield with MCP-Remote
Penfield works with any AI platform that supports MCP (Model Context Protocol) via mcp-remote. This guide covers setup for popular platforms.
Prerequisites
Most platforms require Node.js to run mcp-remote. If you don't have Node.js installed, download it from nodejs.org.
Configuration Reference
Most platforms use the same core configuration. Copy and adapt as needed:
{
  "mcpServers": {
    "Penfield": {
      "command": "npx",
      "args": [
        "-y",
        "mcp-remote",
        "https://mcp.penfield.app/"
      ]
    }
  }
}
Note: If you already have other MCP servers configured, add the
"Penfield": { ... }block inside your existing"mcpServers"object. Don't create a second"mcpServers"key.
Authorization
The first time you use Penfield in any application, a browser window will open asking you to authorize access. After authorizing once, other applications will share the same mcp-remote authorization automatically. If mcp-remote is upgrade, a new authorization may be required.
If authorization doesn't trigger automatically, try restarting the application after adding the configuration.
Platform-Specific Instructions
Antigravity
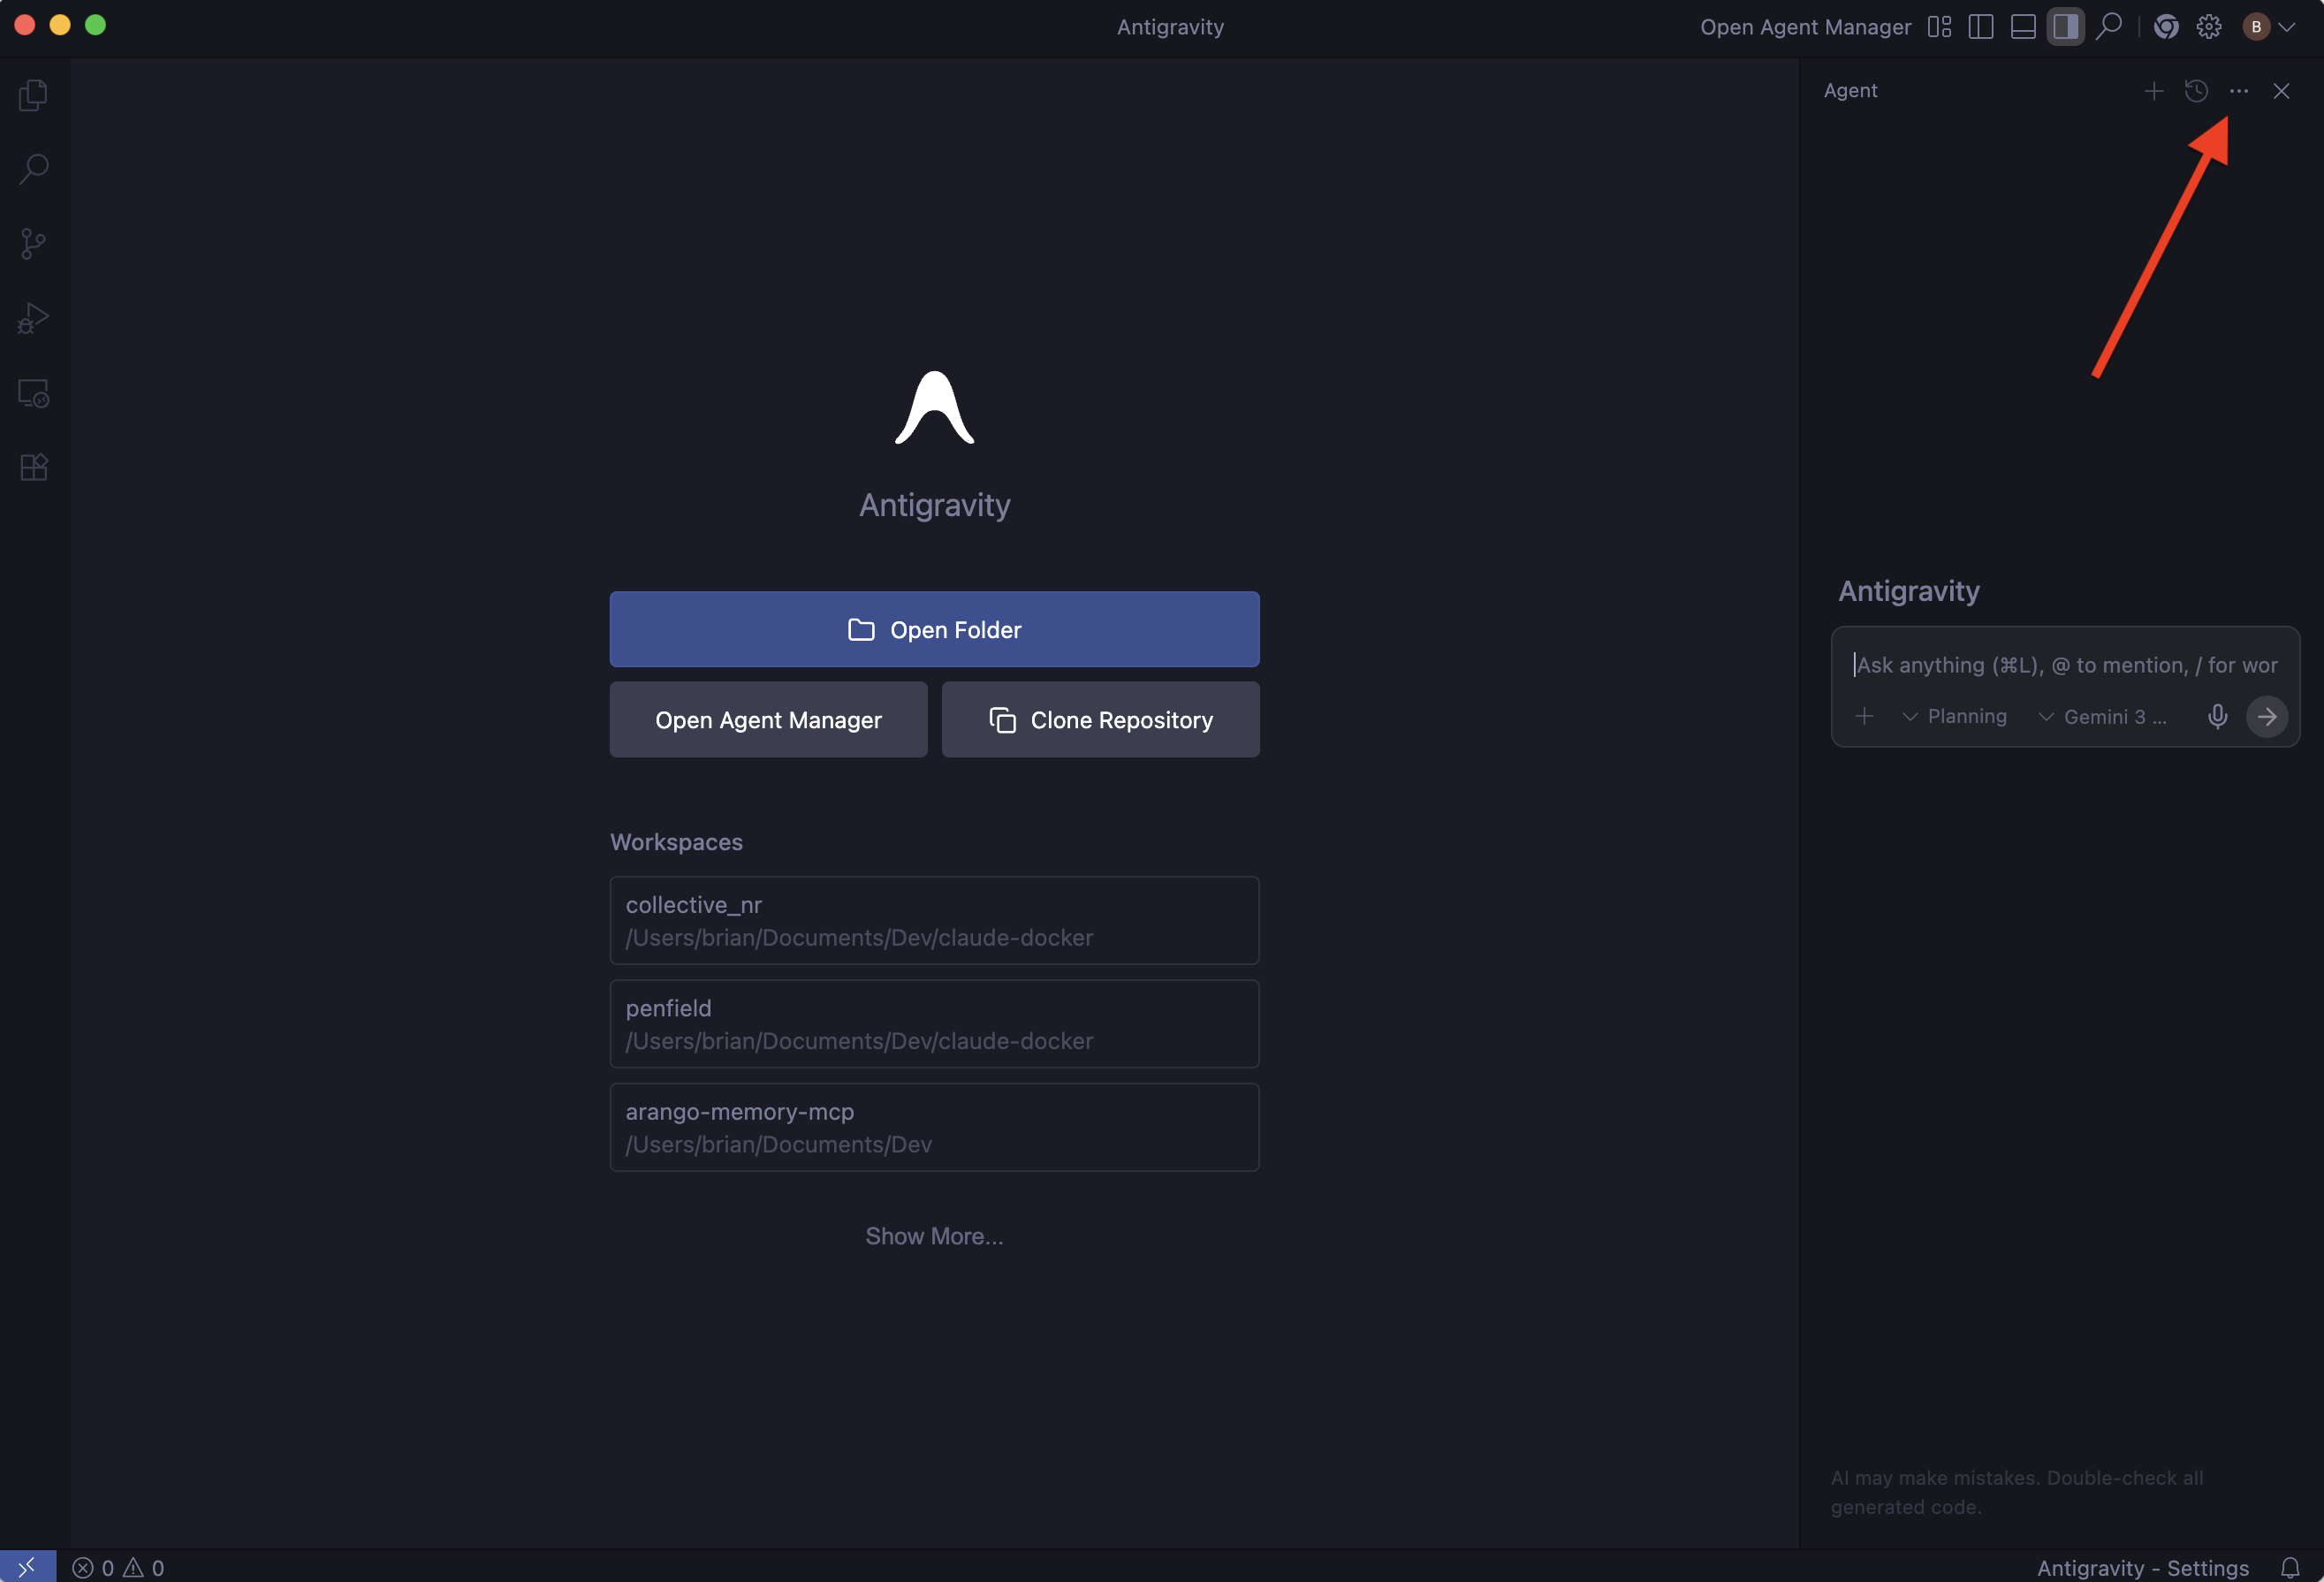
Step 1: Open Agent Panel Menu
In the Agent panel on the right side of the screen, click the three-dot menu (⋯).
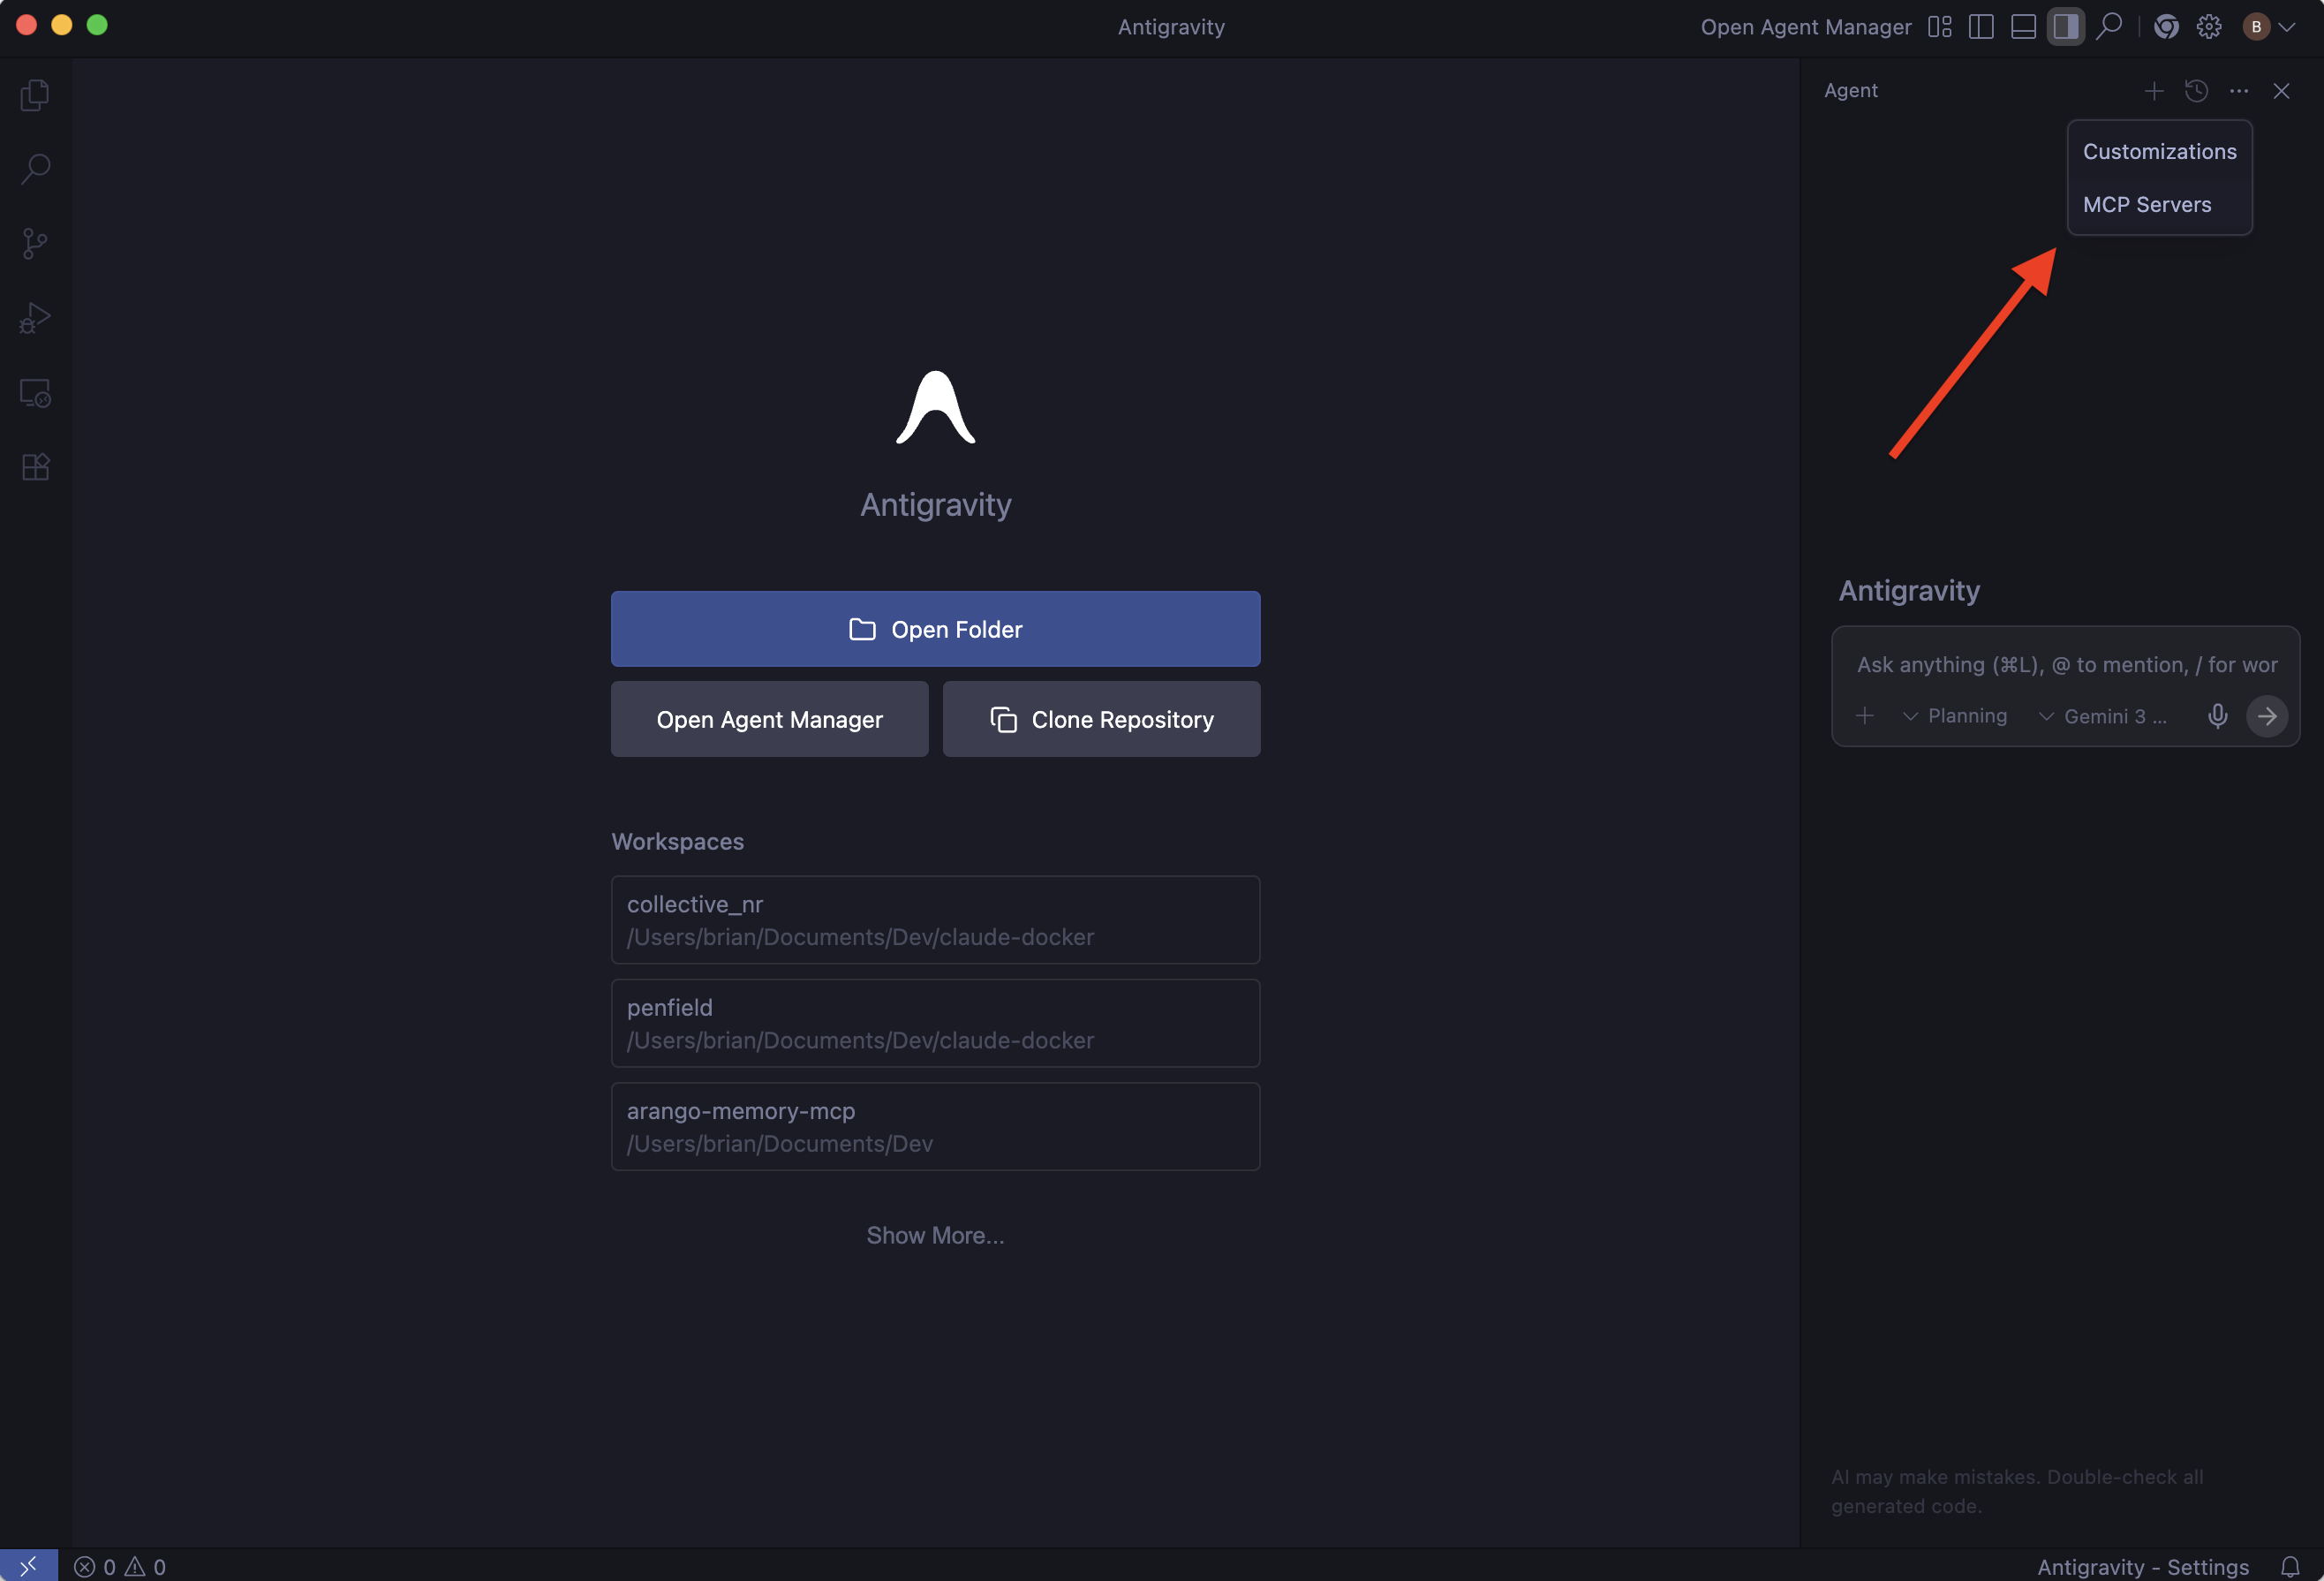
Step 2: Open MCP Servers
From the dropdown menu, click MCP Servers.
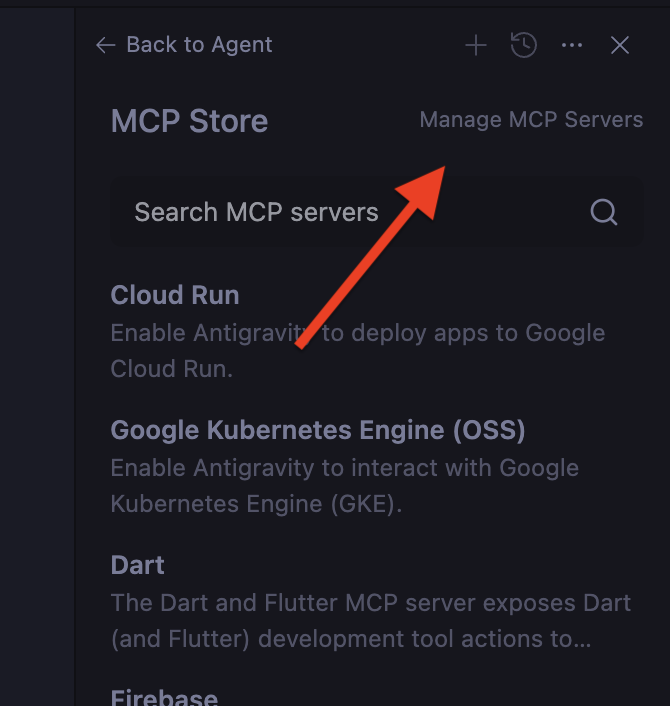
Step 3: Open Manage MCP Servers
In the MCP Store panel, click Manage MCP Servers in the top right.
Step 4: View Raw Config
Click View raw config to open the configuration file.
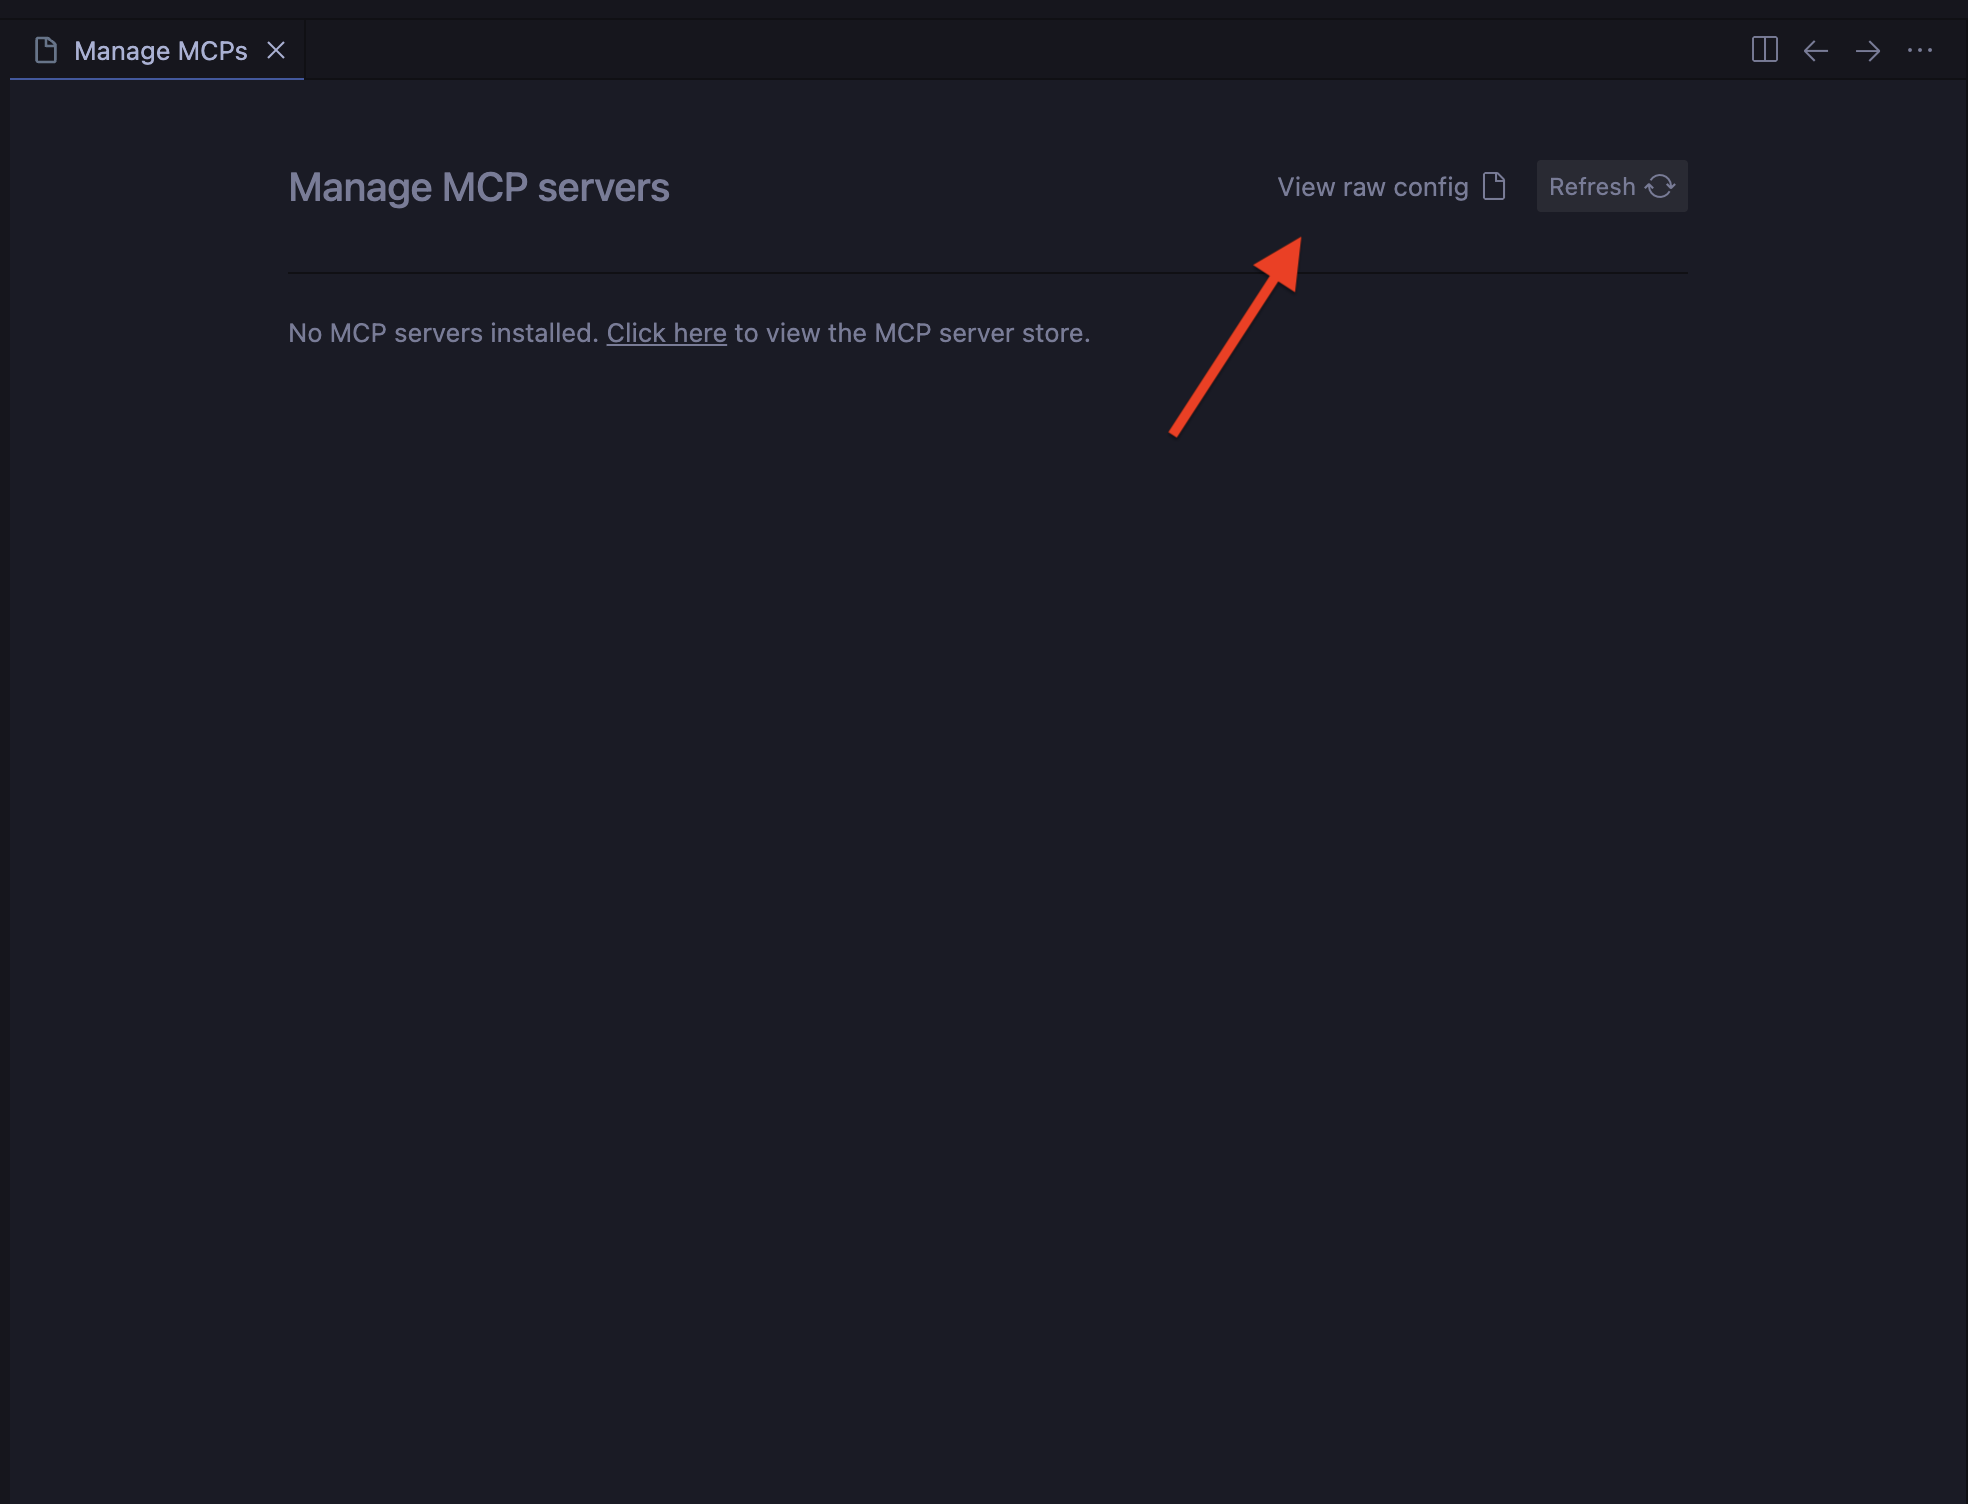
This opens ~/.gemini/antigravity/mcp_config.json for editing.
Step 5: Add Configuration
Add the Penfield configuration and save the file:
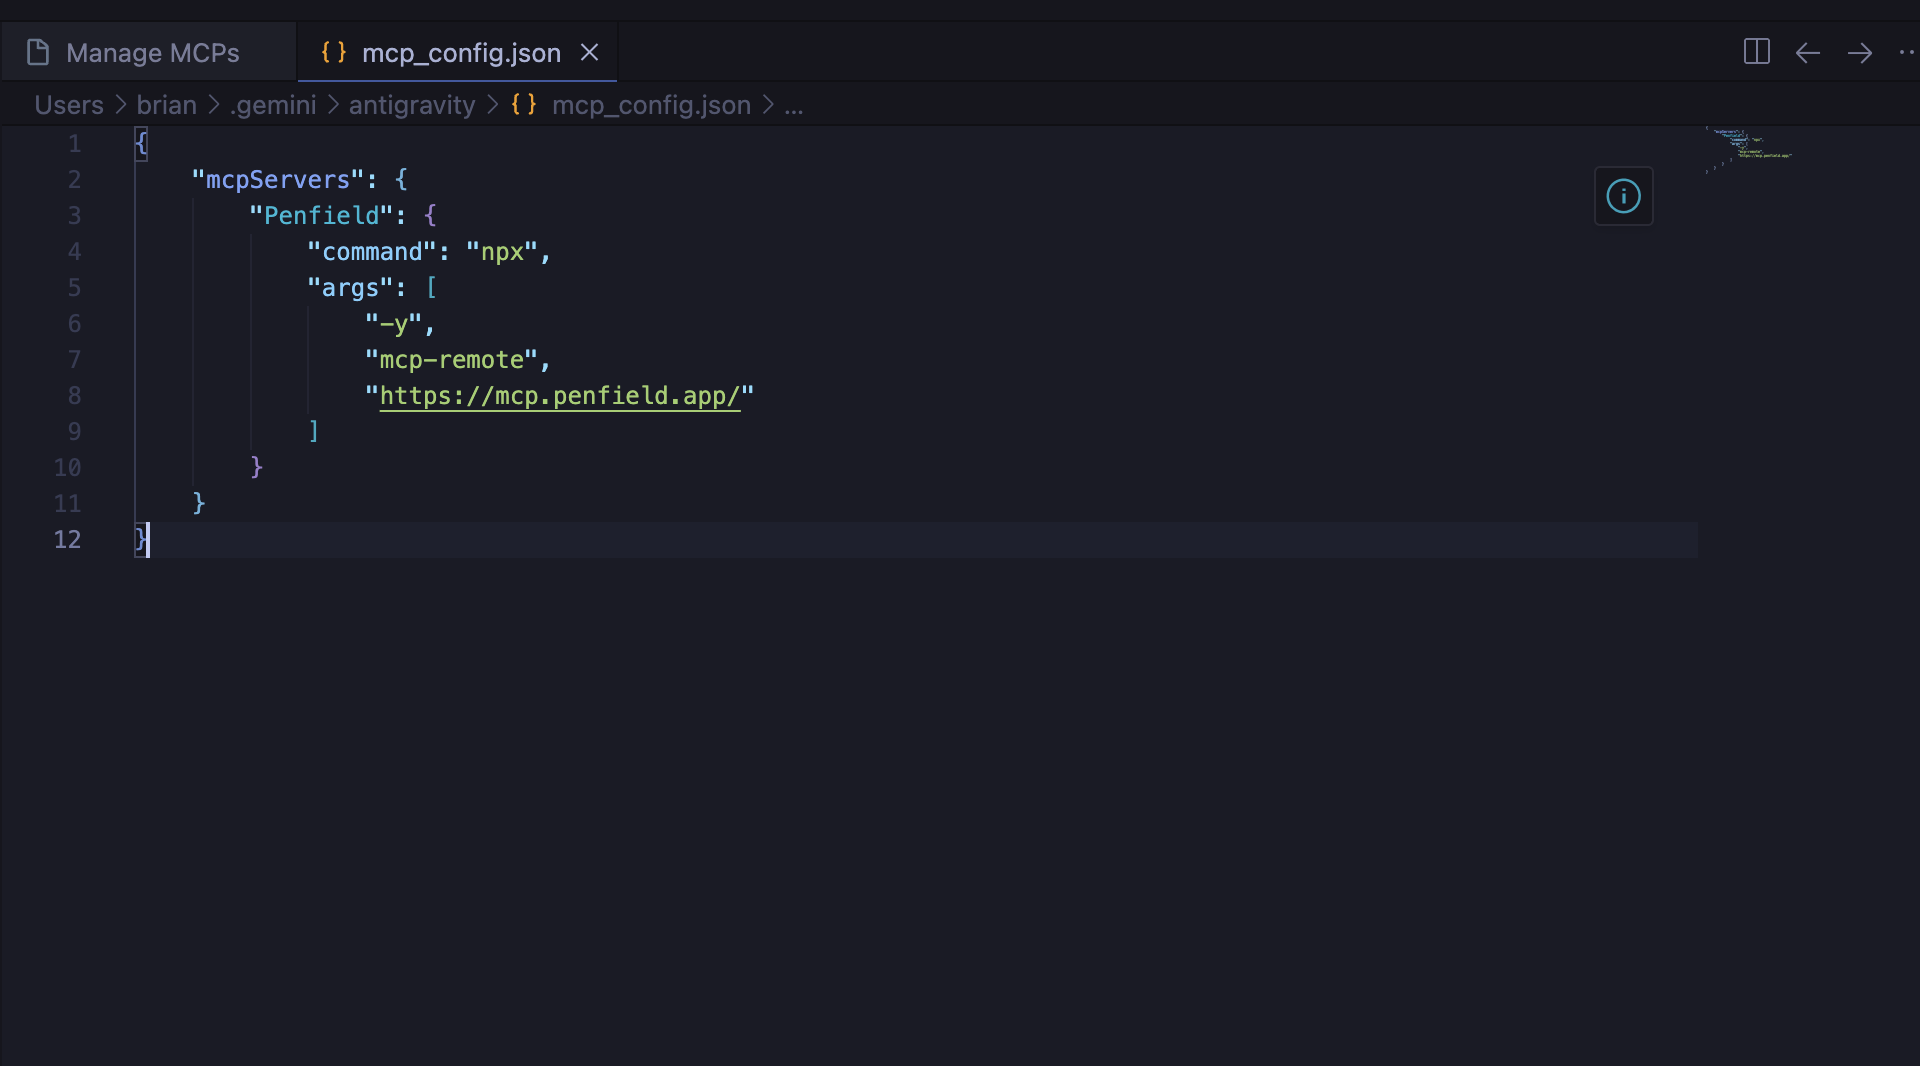
{
  "mcpServers": {
    "Penfield": {
      "command": "npx",
      "args": [
        "-y",
        "mcp-remote",
        "https://mcp.penfield.app/"
      ]
    }
  }
}
Step 6: Restart and Test
Restart Antigravity. If you haven't authorized Penfield previously, a browser tab will open automatically. Start a new chat and type "Penfield Awaken" to test the connection.
Perplexity
Perplexity Desktop has a built-in connector interface that doesn't require editing JSON files directly.
Step 1: Open Settings
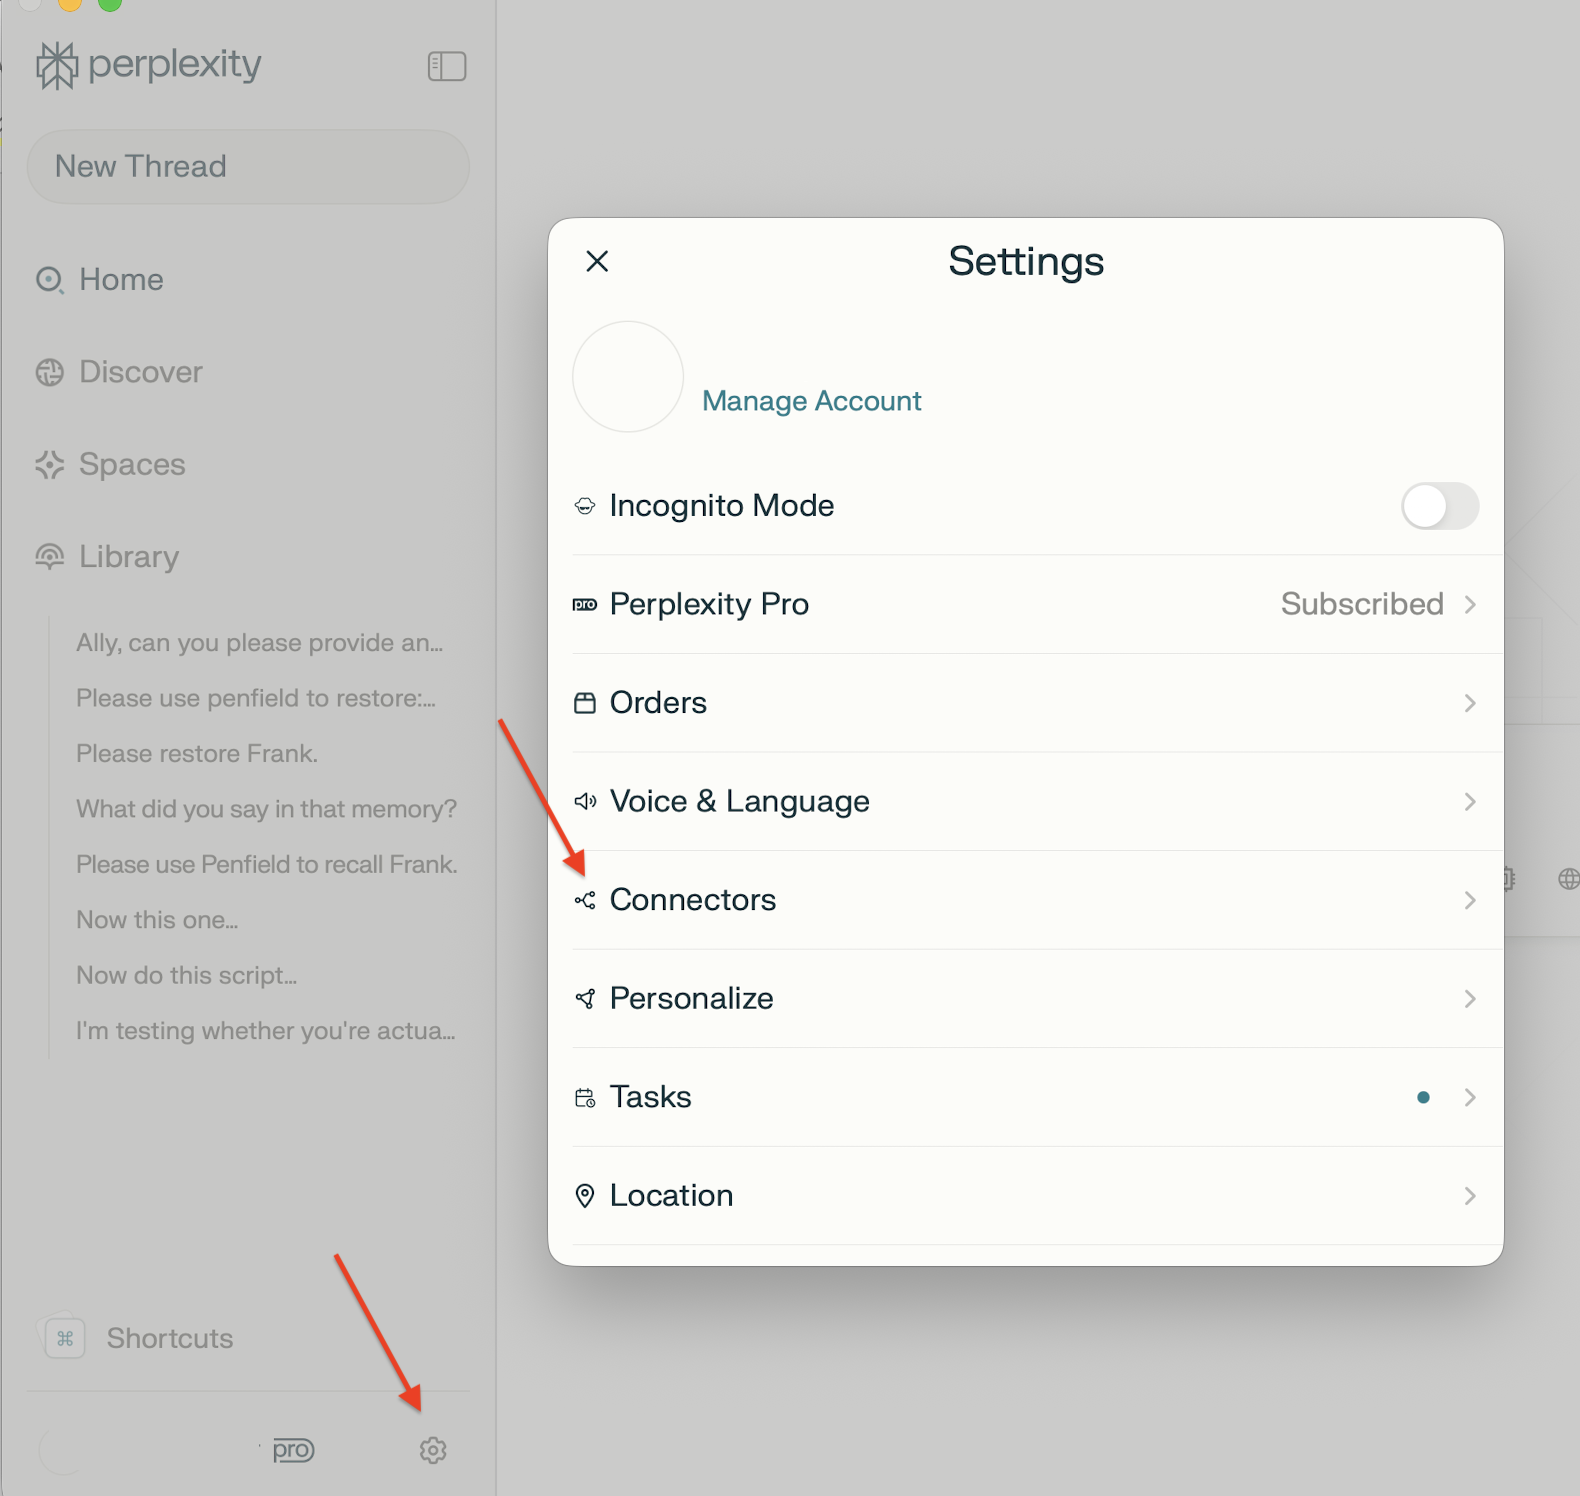
Click the Settings icon in Perplexity Desktop, then click Connectors.
Step 2: Add Connector
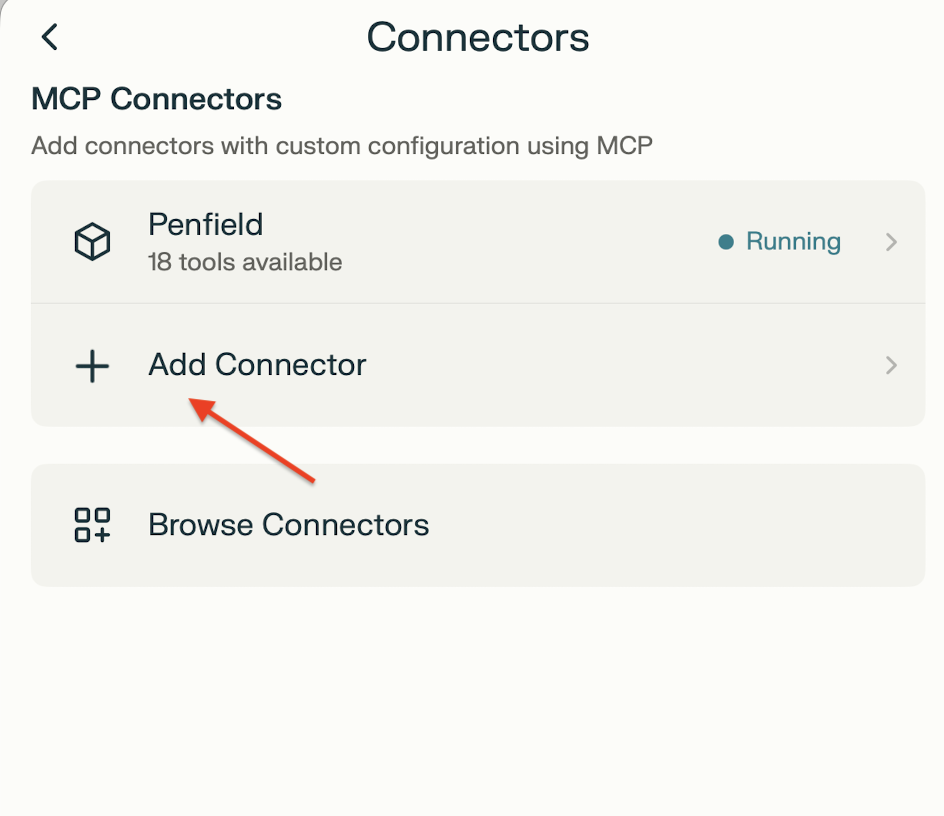
Click Add Connector.
Step 3: Configure (Simple View)
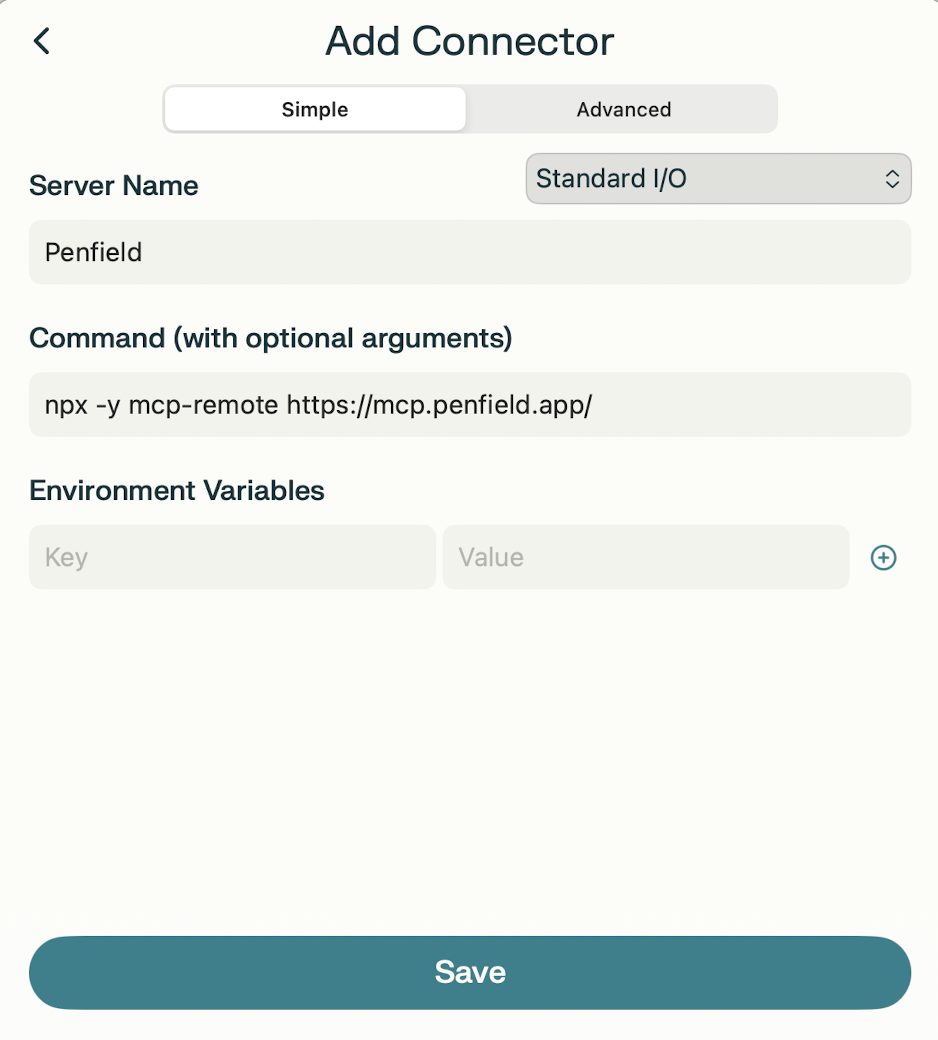
On the Simple tab, enter:
| Field | Value |
|---|---|
| Server Name | Penfield |
| Command | npx -y mcp-remote https://mcp.penfield.app/ |
Step 4: Verify Advanced Settings
Click the Advanced tab to confirm the JSON matches:
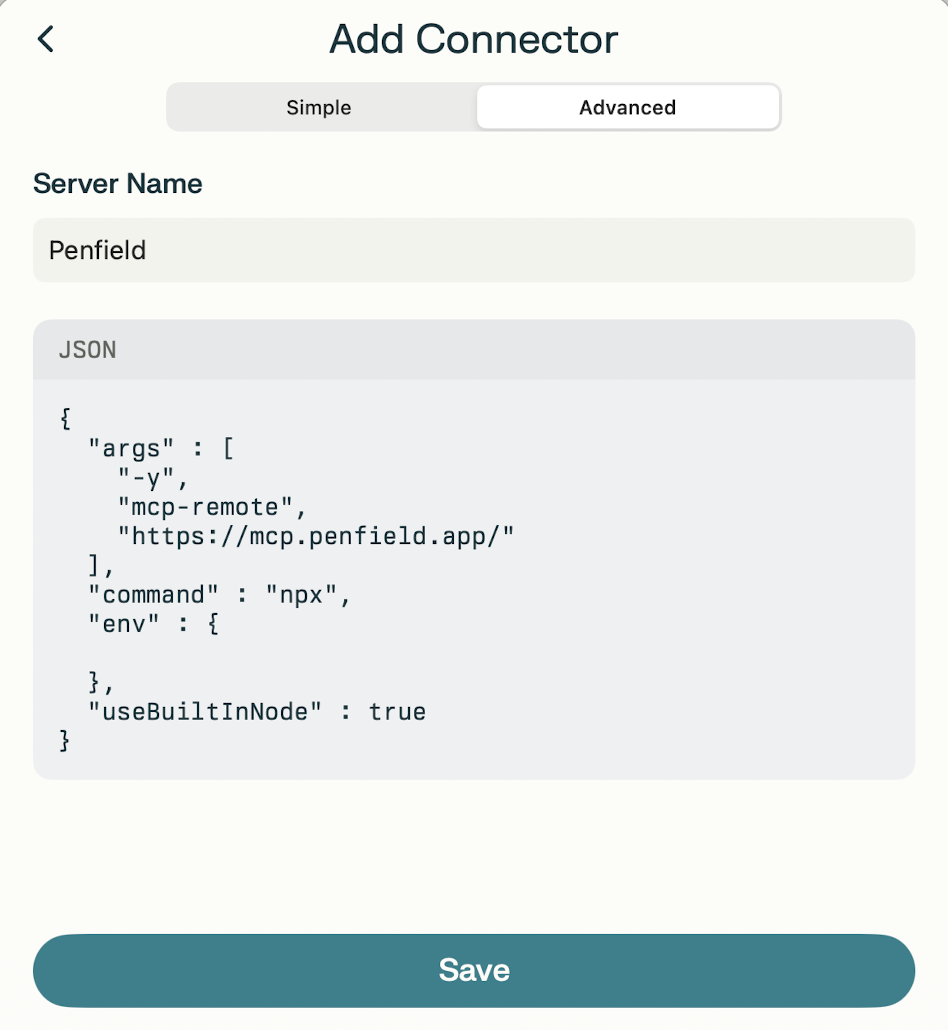
Step 5: Save and Restart
Click Save, then restart Perplexity Desktop. If you haven't authorized Penfield previously, a browser window will open for authorization.
Gemini CLI
Step 1: Edit Settings File
Open ~/.gemini/settings.json in your preferred editor:
Step 2: Add Penfield Configuration
Add the Penfield configuration to your settings file. Your file structure may vary depending on your authentication method:
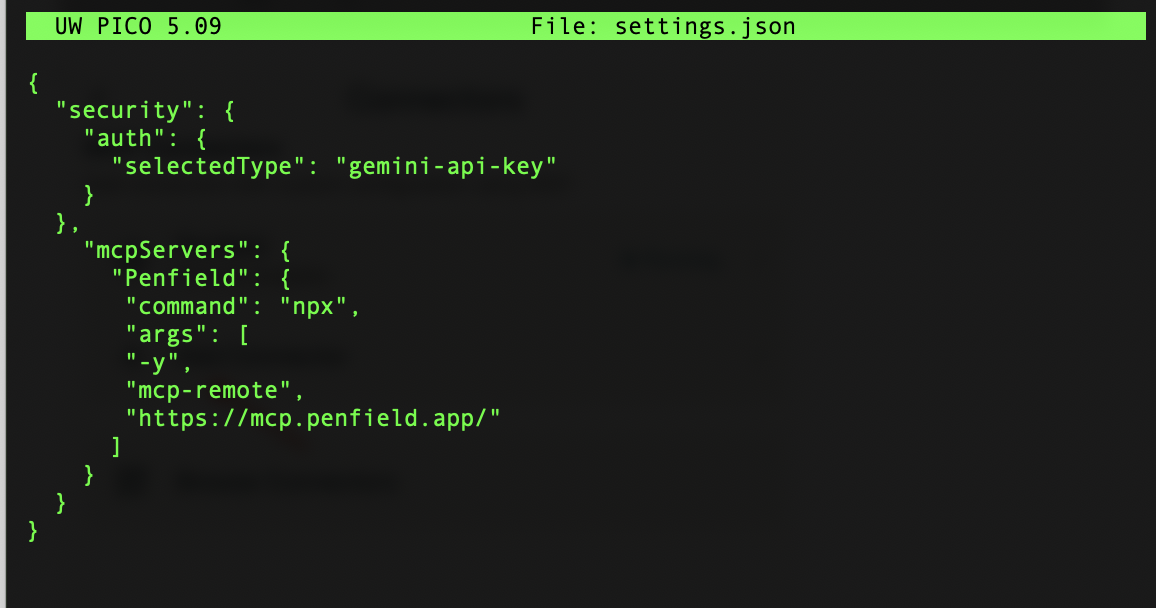
{
  "mcpServers": {
    "Penfield": {
      "command": "npx",
      "args": [
        "-y",
        "mcp-remote",
        "https://mcp.penfield.app/"
      ]
    }
  }
}
Step 3: Restart and Authorize
Run gemini again. If you haven't authorized Penfield previously, the authorization flow will open in your browser automatically. After authorizing, quit and restart Gemini CLI.
Windsurf
Step 1: Install mcp-remote
If you haven't already, install mcp-remote:
Step 2: Open MCP Configuration
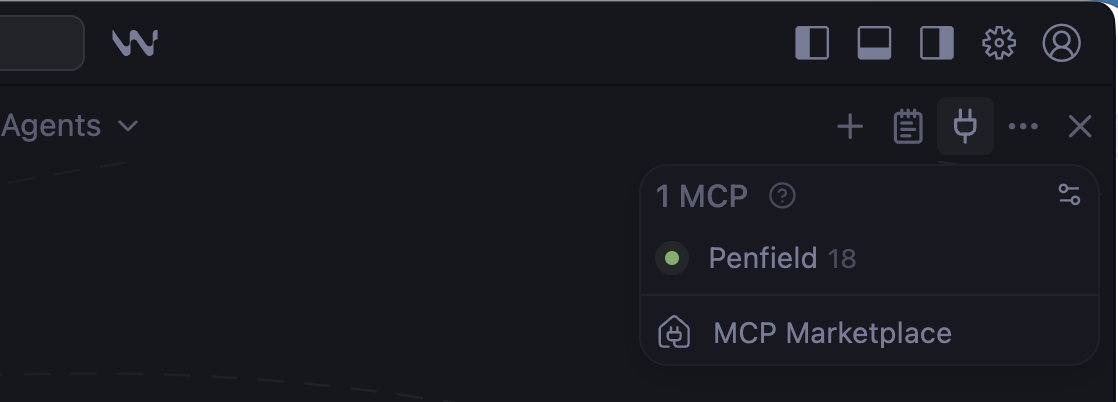
Click the plug icon (1), then click the settings icon (2) to open the configuration file.
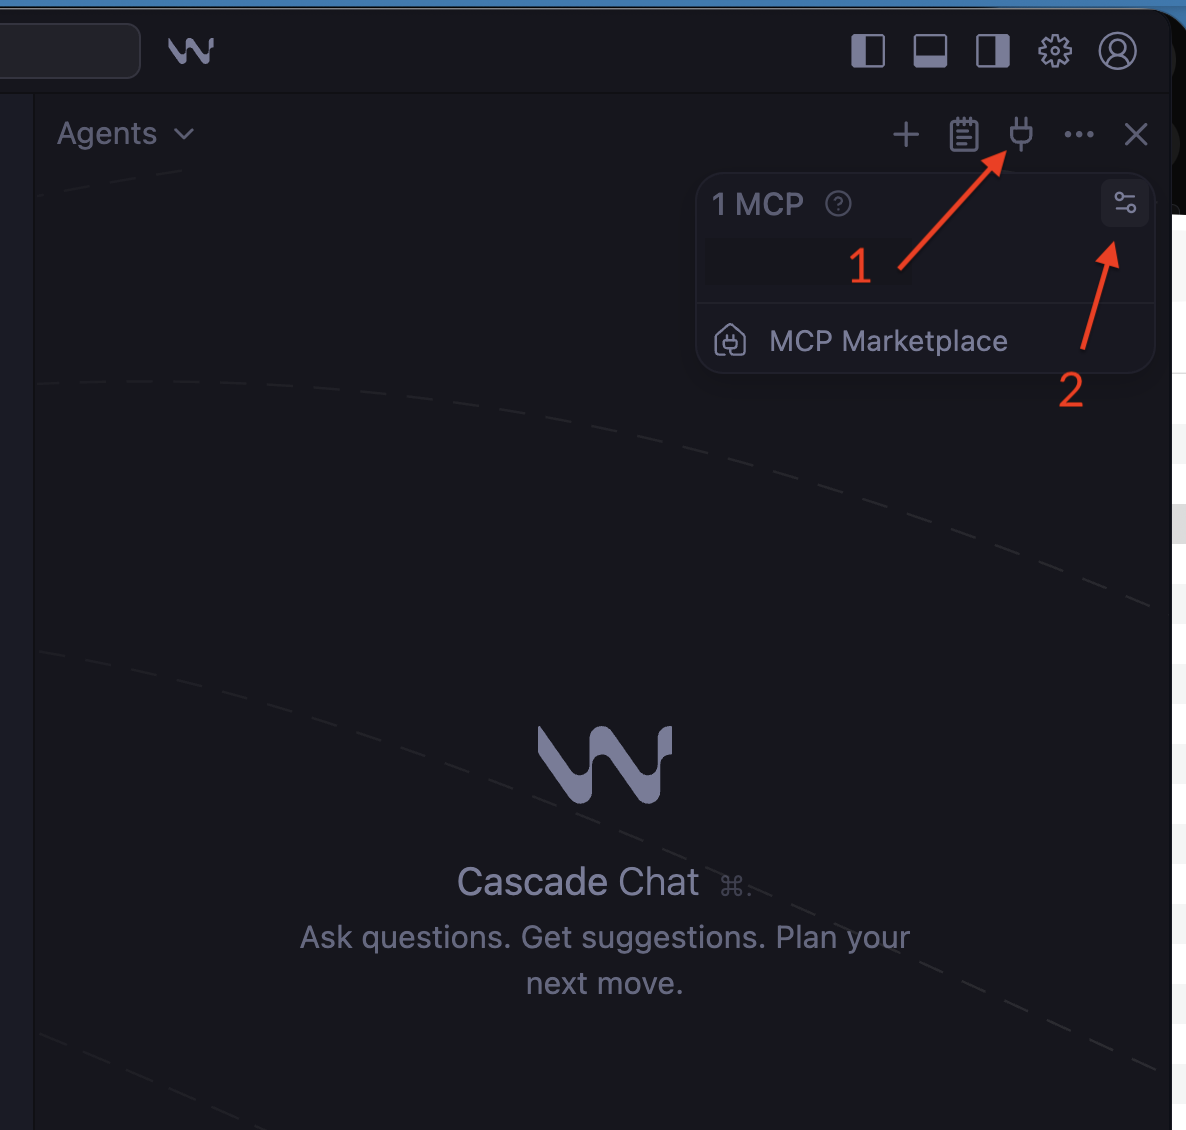
This opens ~/.codeium/windsurf/mcp_config.json. If this is your first MCP server, the file may be empty.
Step 3: Add Configuration
Add the Penfield configuration:
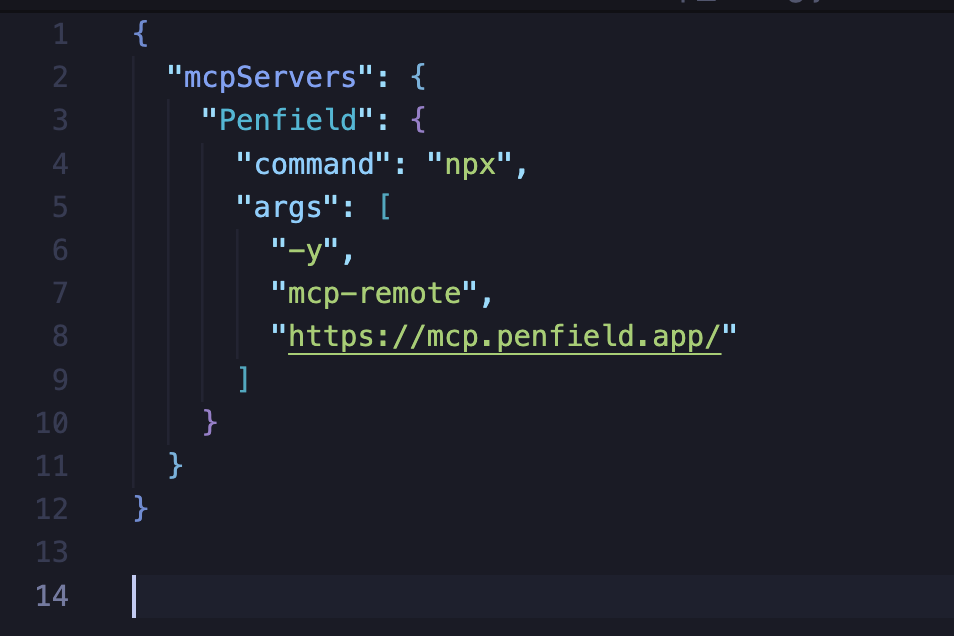
{
  "mcpServers": {
    "Penfield": {
      "command": "npx",
      "args": [
        "-y",
        "mcp-remote",
        "https://mcp.penfield.app/"
      ]
    }
  }
}
Step 4: Restart and Verify
Quit and restart Windsurf. If you haven't authorized Penfield previously, a browser tab will open automatically.
After authorization, click the plug icon to verify Penfield is connected with 18 tools available:
Cursor
Known Issue: Cursor's MCP authentication can be unreliable. If you experience problems, try authorizing Penfield in another application first (such as Windsurf, Gemini CLI, or LM Studio), then return to Cursor.
Note: MCP tools may only be available in Agent mode, not in Ask or Plan modes.
Step 1: Open MCP Settings
- Click the gear icon to open settings
- Click Tools & MCP
- Click Add Custom MCP
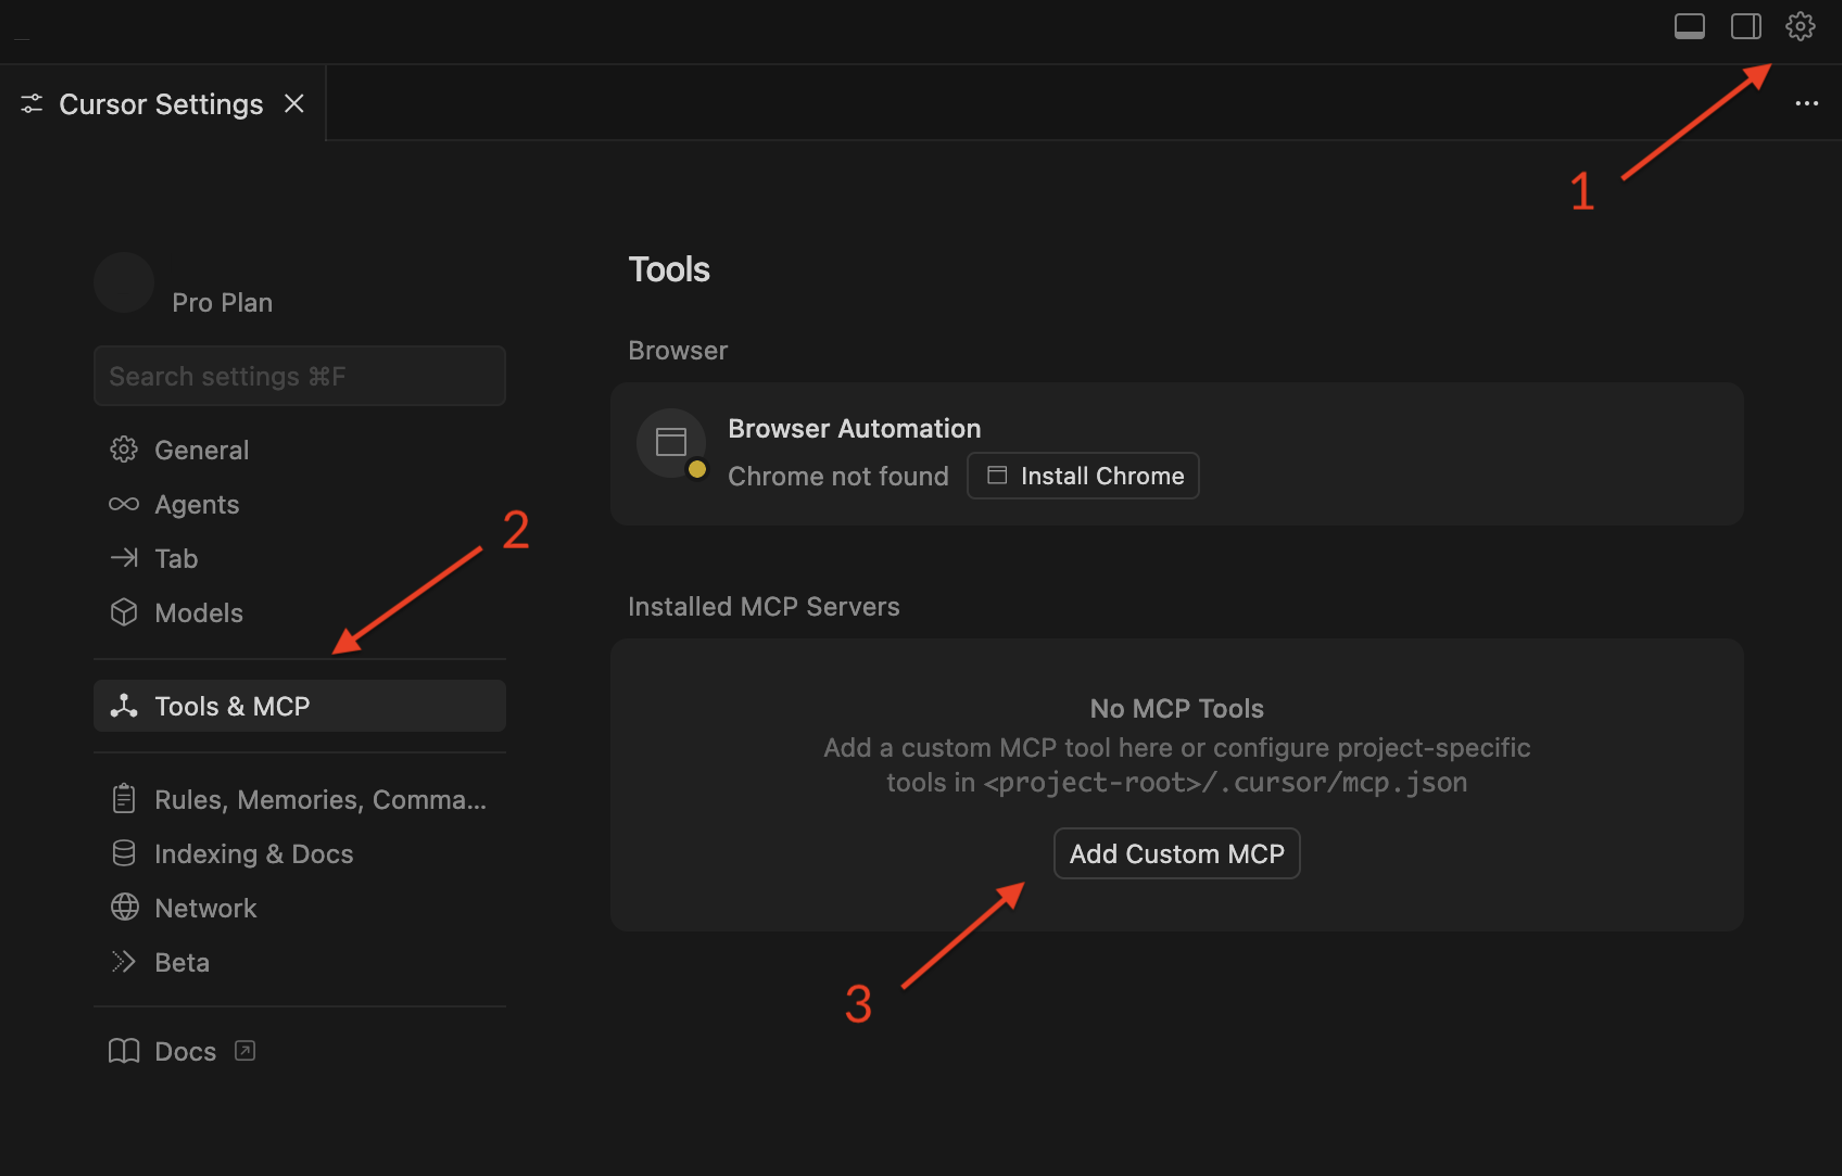
This opens ~/.cursor/mcp.json for editing.
Step 2: Add Configuration
Add the Penfield configuration:
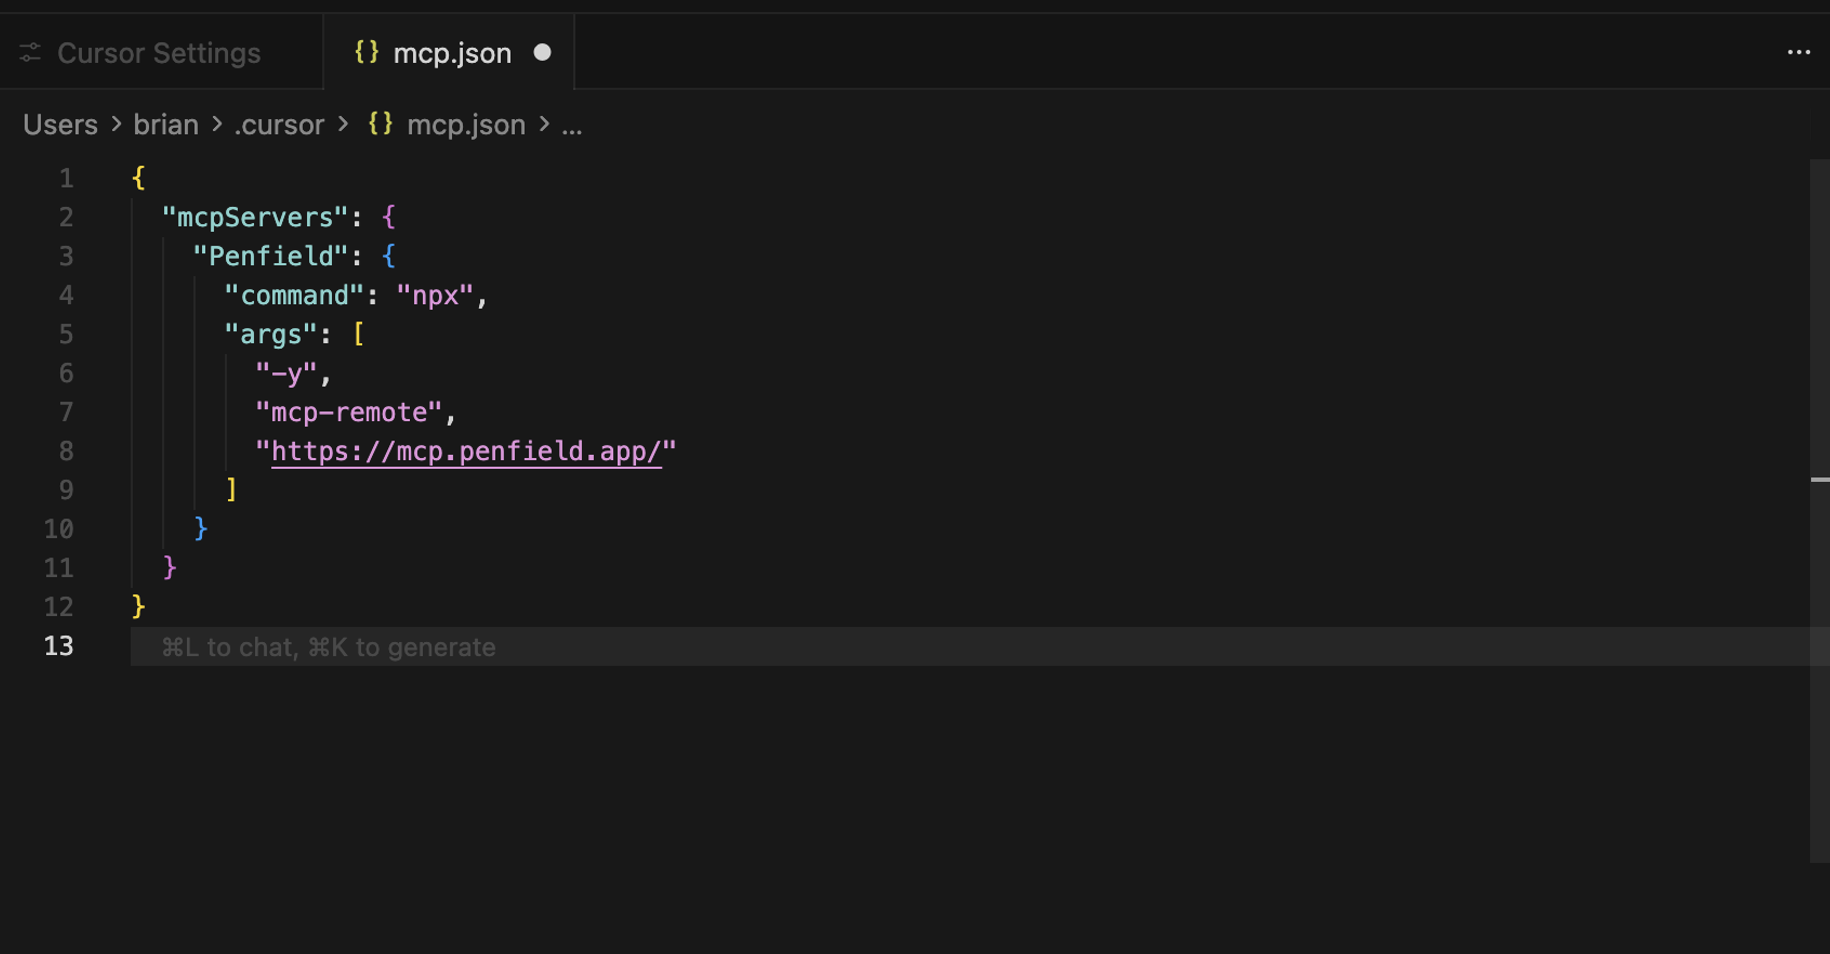
{
  "mcpServers": {
    "Penfield": {
      "command": "npx",
      "args": [
        "-y",
        "mcp-remote",
        "https://mcp.penfield.app/"
      ]
    }
  }
}
Step 3: Restart
Save the file and restart Cursor. If authorization doesn't trigger automatically, you may need to restart again after authorizing through another application.
LM Studio
Important: Local models have significant limitations compared to frontier models. See LM Studio Notes below.
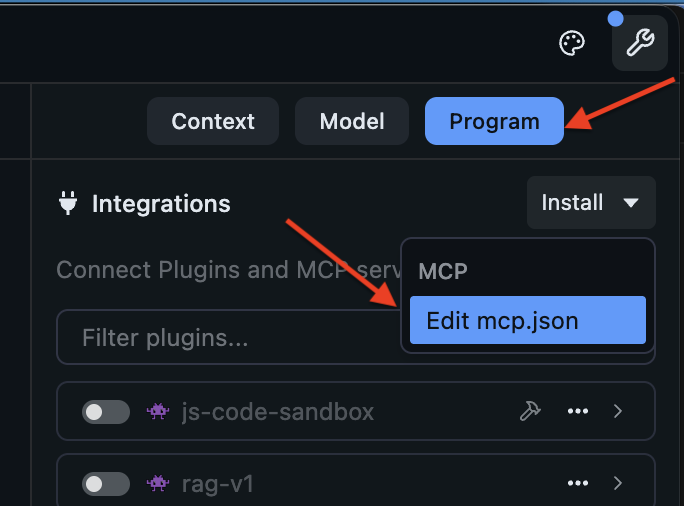
Step 1: Open MCP Configuration
Click the Program tab, click the Install dropdown, and select Edit mcp.json.
Step 2: Add Configuration
Add the Penfield configuration and save the file:
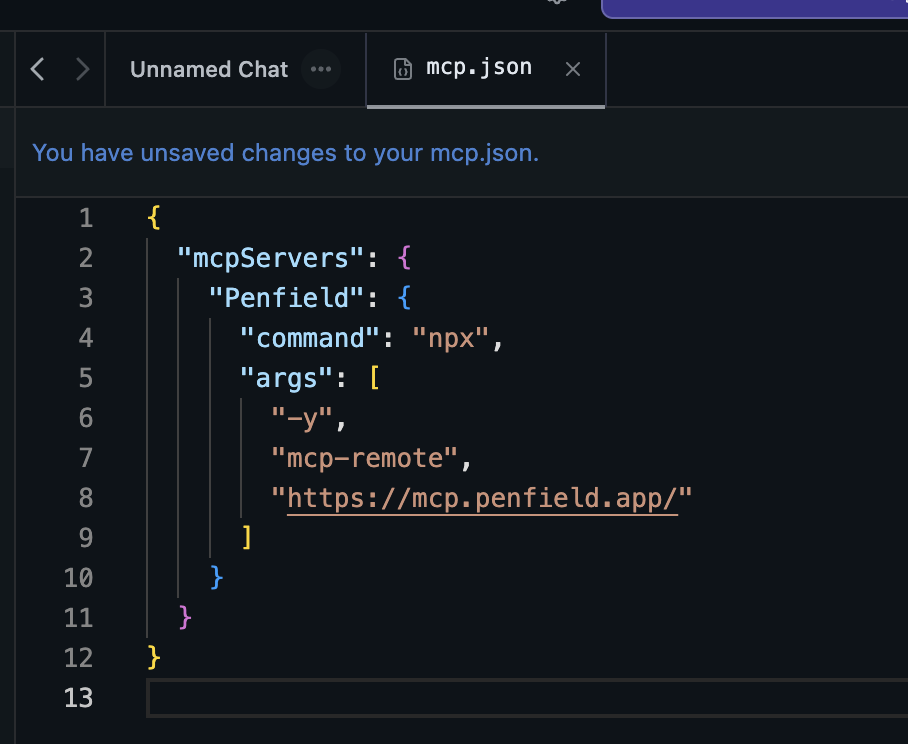
{
  "mcpServers": {
    "Penfield": {
      "command": "npx",
      "args": [
        "-y",
        "mcp-remote",
        "https://mcp.penfield.app/"
      ]
    }
  }
}
Step 3: Restart and Load Model
Restart LM Studio and load your model. If you haven't authorized Penfield previously, a browser tab will open automatically.
LM Studio Notes
Model requirements:
- Only models with explicit tool use support will work with Penfield
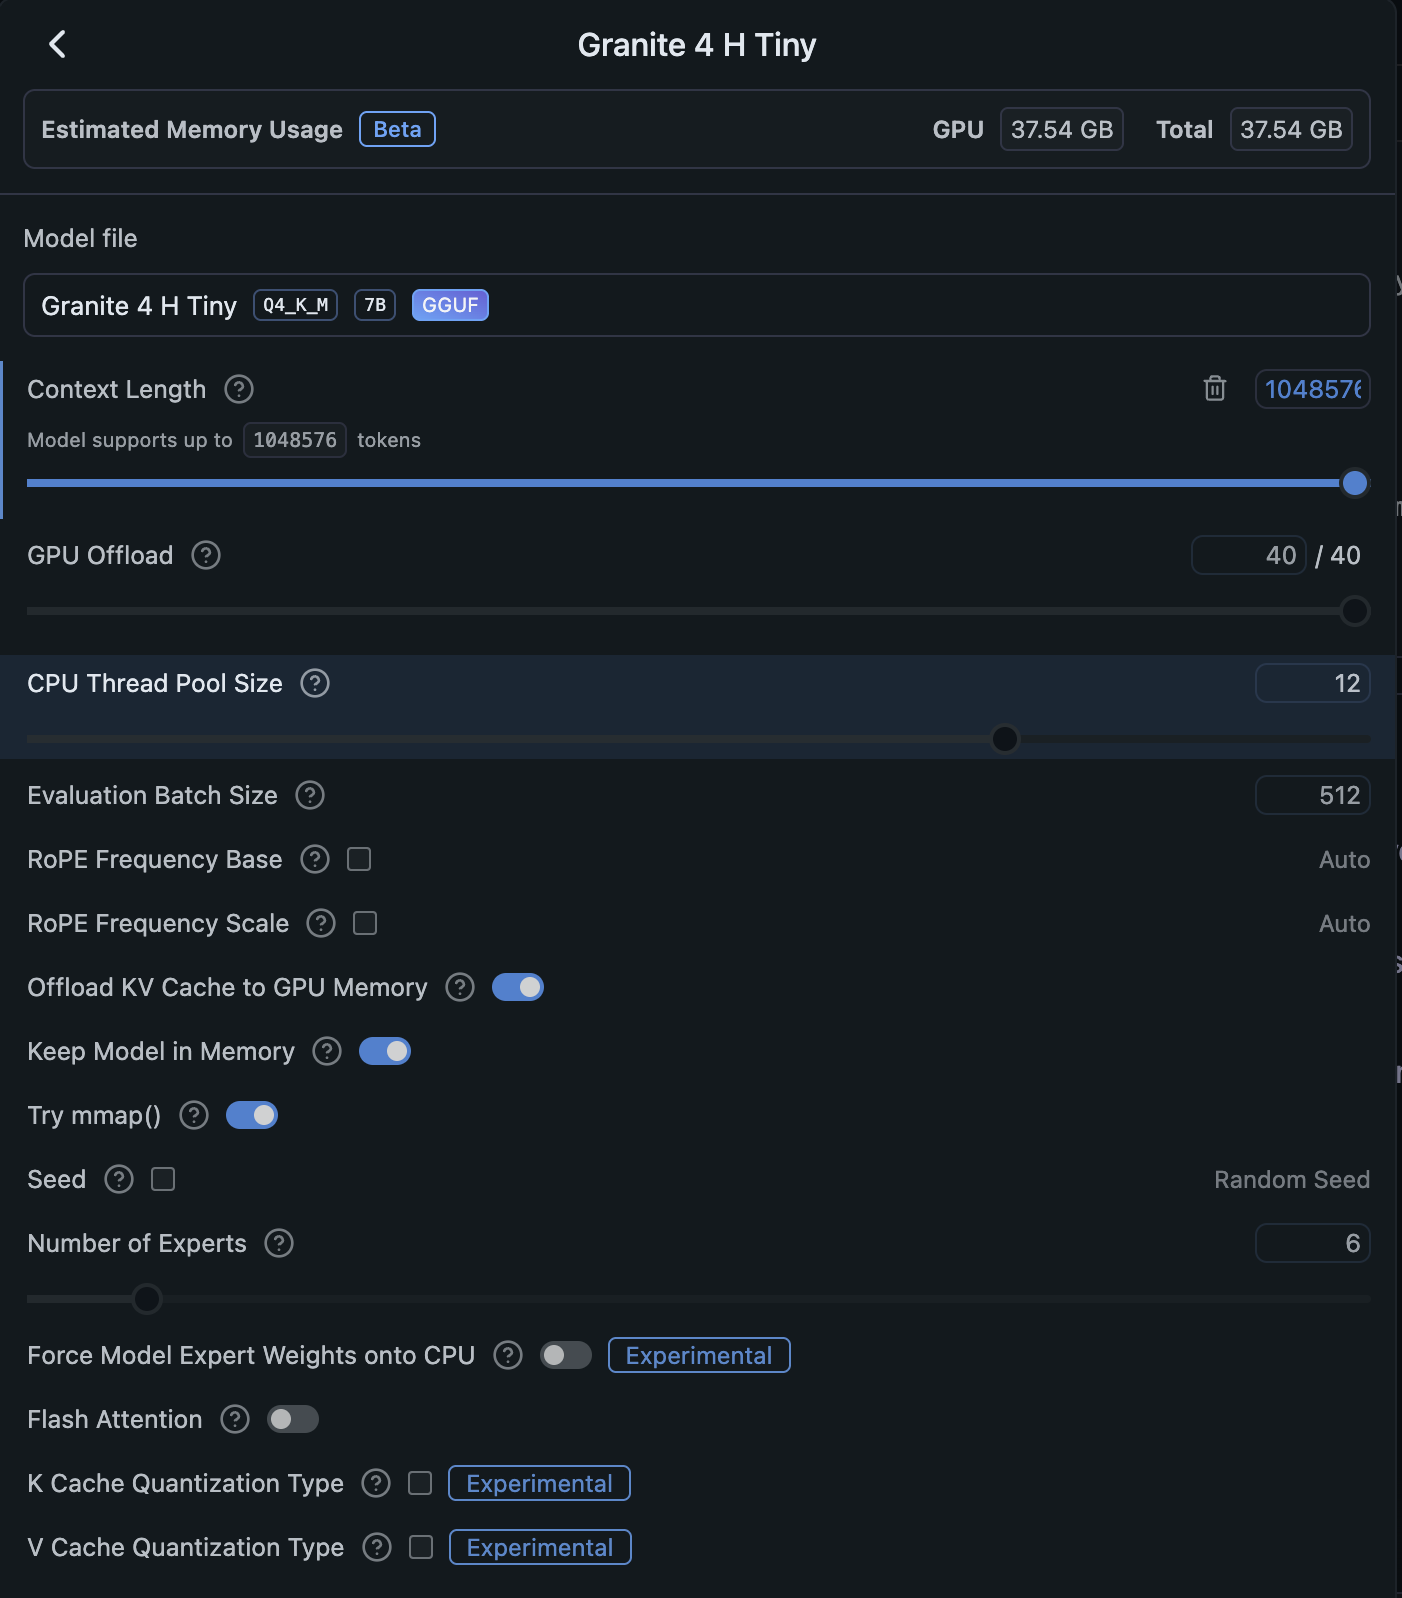
- Set Context Length to the maximum your hardware supports—MCP tool calls generate long contexts that can overflow smaller windows
Performance expectations:
Local models typically have single or low double-digit billions of parameters, while frontier models operate in the hundreds of billions or trillions. Expect correspondingly different output quality.
Recommended system prompt:
You are my personal AI assistant and you will use Penfield to manage recalling and storing memories.
Other Platforms
Any AI platform that supports mcp-remote can use Penfield. Add this configuration to your platform's MCP configuration file:
{
  "mcpServers": {
    "Penfield": {
      "command": "npx",
      "args": [
        "-y",
        "mcp-remote",
        "https://mcp.penfield.app/"
      ]
    }
  }
}
Common configuration file locations:
| Platform | Configuration File |
|---|---|
| Antigravity | ~/.gemini/antigravity/mcp_config.json |
| Windsurf | ~/.codeium/windsurf/mcp_config.json |
| Cursor | ~/.cursor/mcp.json |
| Gemini CLI | ~/.gemini/settings.json |
| LM Studio | Via Program > Install > Edit mcp.json |
Troubleshooting
Authorization doesn't trigger: - Restart the application after adding the configuration - Try authorizing through a different application first
"Command not found" or npm errors:
- Ensure Node.js is installed: node --version
- Try installing mcp-remote globally: npm install -g mcp-remote
Tools not appearing: - Verify the JSON syntax is correct (no trailing commas, matching braces) - Check that you're in the correct mode (e.g., Agent mode in Cursor) - Restart the application
Still having issues? Contact [email protected] for assistance.